There is a dismal lack of clear instruction for configuring BlazeDS AMF services with Spring. Many of the resources that do exist refer to older versions of the software or strict scenarios that do not apply to everyone using Spring for their projects. This document will outline the steps necessary to configure BlazeDS with Spring when using both Spring MVC, specifically, and Flex.

You can grab the latest build of Spring from:
http://www.springsource.org/
You can grab the latest build of BlazeDS from:
http://opensource.adobe.com/wiki/display/blazeds/BlazeDS
First, you will want to be sure that Spring is configured in the following way:
- You will already have a dispatcher servlet entry in your web.xml for Spring MVC similar to the following:
<servlet>
<servlet-name>spring</servlet-name>
	<servlet-class>org.springframework.web.servlet.DispatcherServlet</servlet-class>
		<load-on-startup>1</load-on-startup>
</servlet>
<servlet-mapping>
		<servlet-name>spring</servlet-name>
		<url-pattern>*.do</url-pattern>
</servlet-mapping>
- Be sure to include the following JAR packages in the /WEB-INF/lib directory of your project:
- asm.jar
- blazeds-common-3.0.jar
- blazeds-core-3.0.jar
- cglib-2.2.jar
- com.springsource.edu.emory.mathcs.backport-3.0.0.jar
- com.springsource.flex.messaging.services.remoting-3.2.0.3978.jar
- org.springframework.flex-1.0.3.RELEASE.jar
- commons-codec-1.3.jar
- commons-httpclient-3.0.1.jar
- flex-messaging-common.jar
- flex-messaging-core.jar
- flex-messaging-opt.jar
- flex-messaging-proxy.jar
- flex-messaging-remoting.jar
- flex-rds-server.jar
- xalan.jar
- commons-logging.jar
- cfgatewayadapter.jar
- spring-flex-1.0.1.RELEASE.jar
To get BlazeDS integrated with Spring, complete the following steps:
- Add the following lines to web.xml:
<servlet-mapping>
	<servlet-name>spring</servlet-name>
	<url-pattern>/messagebroker/amf</url-pattern>
</servlet-mapping>
- Add the following lines to your servlet XML file:
<bean class="org.springframework.web.servlet.mvc.annotation.DefaultAnnotationHandlerMapping"/>
<bean class="org.springframework.web.servlet.mvc.annotation.AnnotationMethodHandlerAdapter"/>
<flex:message-broker>
	<flex:mapping pattern="/messagebroker/amf" />
</flex:message-broker>
- Create a file called “services-config.xml” and add this to /web-inf/flex:
<?xml version="1.0" encoding="UTF-8"?> <services-config> <services> <default-channels> <channel ref="my-amf" /> </default-channels> </services> <channels> <channel-definition id="my-amf" class="mx.messaging.channels.AMFChannel"> <endpointurl=http://{server.name}:{server.port}/{context.root}/messagebroker/amf class="flex.messaging.endpoints.AMFEndpoint" /> <properties> <polling-enabled>false</polling-enabled> </properties> </channel-definition> </channels> <logging> <target class="flex.messaging.log.ConsoleTarget" level="info"> <properties> <prefix>[BlazeDS]</prefix> <includeDate>false</includeDate> <includeTime>false</includeTime> <includeLevel>true</includeLevel> <includeCategory>false</includeCategory> </properties> <filters> <pattern>Endpoint.*</pattern> <pattern>Service.*</pattern> <pattern>Configuration</pattern> </filters> </target> </logging> </services-config> - Import the RemotingDestination class and add the following annotations to any Java classes that will be used by Flash:
import org.springframework.flex.remoting.RemotingDestination; @Service("flexService") @RemotingDestination(value="flexService",channels={"my-amf"}) - If you are using Spring security, add the following line to whichever xml you are using to define security parameters so we can access message broker:
<security:intercept-url pattern="/messagebroker/**" access="IS_AUTHENTICATED_ANONYMOUSLY" />
Now, to get Flex talking to Java through BlazeDS, we must configure our application as such:
- Import the remoting event packages so that we can send data over AMF:
import mx.rpc.events.FaultEvent;
import mx.rpc.events.ResultEvent;
- Now, in your declarations tag, set up a RemoteObject structure similar to this:
<fx:Declarations>
		<s:RemoteObject id="ro" endpoint="http://website.root/messagebroker/amf" destination="flexService" result="resultAMF(event)" fault="faultAMF(event)">
			<s:method name="methodNameFromJavaClass">
				<s:arguments>
					<arg1>{arg1}</arg1>
					<arg2>{arg2}</arg2>
					<arg3>{arg3}</arg3>
				</s:arguments>
			</s:method>
		</s:RemoteObject>
</fx:Declarations>
If you are not passing any arguments, you can simplify the setup as such:
<fx:Declarations>
	<s:RemoteObject id="ro" endpoint=" http://website.root/messagebroker/amf" destination="flexService" result="resultAMF(event)" fault="faultAMF(event)"/>
</fx:Declarations>
- Create methods to handle the result and fault events reported through our remote service:
private function resultAMF(e:ResultEvent):void {} private function faultAMF(e:FaultEvent):void {} - To invoke a remoting call through BlazeDS AMF, simply invoke the specific method off of our remote object instance:
ro.methodNameFromJavaClass.send();
That should be all there is to it.
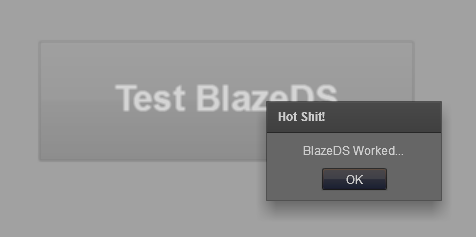
If you want to test this quickly, here is some quick MXML to do so:
<?xml version="1.0" encoding="utf-8"?>
<s:Application xmlns:fx="http://ns.adobe.com/mxml/2009"
			   xmlns:s="library://ns.adobe.com/flex/spark"
			   xmlns:mx="library://ns.adobe.com/flex/mx"
			   width="600" height="400">

	<fx:Script>
		<![CDATA[
			import mx.controls.Alert;
			import mx.rpc.events.FaultEvent;
			import mx.rpc.events.ResultEvent;

			protected function testAMF(e:MouseEvent):void {
				ro.helloWorld.send();
			}
			private function resultAMF(e:ResultEvent):void {
				Alert.show("BlazeDS Worked...", "Hot Shit!");
			}
			private function faultAMF(e:FaultEvent):void {
				Alert.show(e.fault.faultString, "Duck and Cover!!!");
			}
		]]>
	</fx:Script>

	<fx:Declarations>
		<s:RemoteObject id="ro" endpoint="http://website.root/messagebroker/amf" destination="flexService" result="resultAMF(event)" fault="faultAMF(event)"/>
	</fx:Declarations>

	<s:Button width="375" height="120" label="Test BlazeDS" click="testAMF(event)" fontSize="36" fontWeight="bold" horizontalCenter="0" verticalCenter="0"/>

</s:Application>
Special thanks to Carrie Lorenz for figuring out all the Spring MVC bits and assisting with this documentation.
Note that this document was compiled from our internal experiences integrating BlazeDS and Spring MVC. This is what worked for us… we do not claim to be experts in this area – if you have any feedback, please let us know!
UPDATE: Also check out Edward Montgomery’s post on using BlazeDS with Java (POJOs) using Tomcat!
Hi, thax for this example.
Where I can find the source code for this project?
Michael
I linked to the BlazeDS and Spring source – the project I’m using it all for is not open source.